
11-13-2011 Update – adds 16:9 subpicture mapping bug workaround.
0. 16:9 subpicture mapping bug – how to avoid?
When you have a 16:9 widescreen project, your subpicture mapping will get screwed. Subpicture may not show in widescreen or letterbox mode. This is a well known bug in Scenarist. Here is the workaround.
![Scenarist 169 custom subp stream 0_thumb[10]](https://blogger.googleusercontent.com/img/b/R29vZ2xl/AVvXsEjqdCiRpk9hH8-_oyKPNNuig5MYDYYgpzK2xbJdkL2iYdtKNkccWaFeXYZwx_GVw0XsvhSeXwZyvZjmvV-kyVb2pvH8zjj79uxKEdnMJBnl5KzchjlXW6IP_NHMRfz_B9gB4eDyZx3OnpQ/?imgmax=800 "Scenarist 169 custom subp stream 0_thumb[10]")
In the mean movie, you need to specify the subpicture for widescreen and letterbox by pressing down the W or L button. The default is always W button. Normally you would have to supply two separate subpicture streams for both W and L. But now with the decreasing number of CRT sets out there, a quick way to do this is to supply one widescreen correct rendered stream for both W and L. This is achieved by just pressing both W and L for the same stream.
![Scenarist 169 custom subp stream 1_thumb[2]](https://blogger.googleusercontent.com/img/b/R29vZ2xl/AVvXsEgsQ6r3z_H4LwXdYxuIq0A7EJjOZi1lA1mH5BFtbxbsLX7ETUEgafS8az52yMqH-0uB33osOiHOP6DdHgCaNTyivYbD_vTCno1re8Z78vC5Hzti4jJagvfP5SKgVt8RoXjjx21ev056IeU/?imgmax=800 "Scenarist 169 custom subp stream 1_thumb[2]")
Now select the VTS in Scenario Editor. In the “Subpicture Availability Flag Policy”, change it to to “Custom”. Now the available subpicture streams will be shown. In the example, there are two subpicture streams, one for English, one for Chinese.
![Scenarist 169 custom subp stream 2_thumb[2]](https://blogger.googleusercontent.com/img/b/R29vZ2xl/AVvXsEg5CwG-_AXJKrNkQxu5mf01TNK-jqFGASetTOzaR_k1Sqg6V2VDDMruslQ-pYzLn8Ea5K4SFQ4v6A1veph7I9YzJitldHOHPuQrX9kv23jJGTUJHGaLTm6rta80X8eb-_PCGAzbqrwnODA/?imgmax=800 "Scenarist 169 custom subp stream 2_thumb[2]")
Select the PGC of the main movie. Double click “Subpicture Attribute”. Here there are two items listed corresponding to the streams previously set in VTS. Double click the first “PGC Sub-Picture Attr” item. For Decoding Stream Number for Widescreen, check 0 English (wide & Letter); For Decoding Stream Number for Letterbox, check 0 English (wide & Letter). This will map the subpictures 1 to both widescreen and letterbox mode. This means when you view the disc on widescreen TV, the subpicture for the widescreen mode will be picked up; when you view the disc on 4:3 Letterbox CRT TV, the subpicture for the letterbox mode will be picked up. Do the same thing to the second “PGC Sub-picture Attr” item, but change the subpicture to Chinese ones.

After muxing, you’ll see the results.
This is the quick way to do, but if you want to follow the 16:9 corrected subpicture for 16:9 mode and 4:3 corrected subpicture for 4:3 mode rigorously, you have to supply two subpicture streams and map them correctly.
1. Audio/Subtitle Language Code Extension – how to?
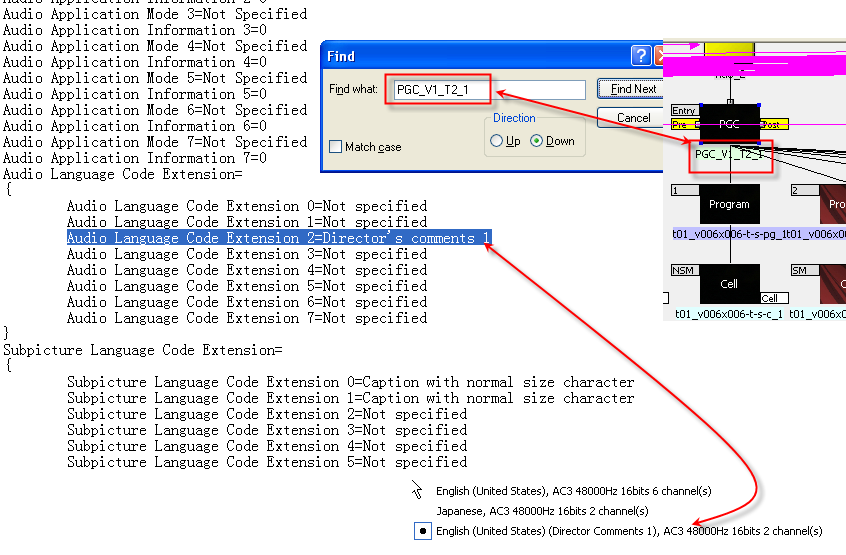
Sometimes when you play a DVD in software players (PowerDVD, winDVD, etc), you’ll notice that the audio has more than the regular information (AC3, DTS, etc), the audio also shows if it’s a auido commentary, or a captions, etc. The same goes for subtitles. So how do you do this?
The painful way is to edit the *.scp project file, to get *.scp file, you need to export the project first…

The easy way is to edit in scenario editor. Click on the VTS, in Property Browser, you’ll see "Audio language code extension” and “Subtitle language code extension”, double click those, you’ll get to see those settings via drop down menu.
Note: this editing affects all the titles under VTS. So if you don’t want other titles to have these properties, you’ll need put those under a different VTS.

2. Push the disc’s size boundary, where’s my layer break?

Once your project size is over 8GB, scenarist starts to go “red” on layer 0 and layer 1. It’s more of estimation, you can ignore the reds, and still add stuff. But each layer has to be around 4.20GB, that’s the limit of layers. If you go over 4.20GB on each layer, your project is over size. If you choose OTP, then Layer 0 must be bigger than Layer 1. But how much bigger? Scenarist will give you a wrong impression that as long as Layer 0 is bigger than Layer 1, that’s OK. But in reality, to get a valid layer break, Layer 0 need to be at least 0.04GB bigger than Layer 1 to be safe, also when you use lots of still images, the estimation is extremely inaccurate, still images (browseable slides usually take less space then the estimation)
The real layer break can be seen easily using Rom Formatter.

Per the Imgburn, an empty Verbatim 2.4X DVD+R DL will have 2,086,912 sectors on each layer. When you compile the project, scenarist will give you the correct layer size (in information Browser - Build) as sectors as well. Add 16 sectors on top of that (Imgburn does the 32K padding to ifo/bup automatically), that’s your real layer break in Imgburn. In this case as shown above, scenarist indicates layer 1 starts 2084144, add 16, you get 2084160, that’s your real layer break which is still under the maximum 2086912, so that you can burn with no worry.


The DVD file system is actually more complicated than Blu-ray’s UDF 2.5, UDF 2.6. The added Joliet supports foreign characters, also characters longer than 8.
4. Wrong button mapping although previews fine in simulator window

so this new problem is the most recent one that I’ve discovered. I’ve been scratching my head about this weird issue. This seems to be only happening on my new authoring machine (dual core), I’ve never had this problem on my old notebook (single core).
Finally I was able to pinpoint the problem last night.
This issue arises from when modifying couple projects demuxed by DVD Reauthor Pro, while the original discs are compiled using DVDMaestro. Using scenarist, while the menus previewed fine, the compiled projects have messed up button mapping. Above picture as viewed in PGCEdit. The left column, from top to bottom, supposed to be 1,2,3,4, but the last button now is #6! Also the button routing information is messed up.

So in scenarist, you can choose to view the button properties.

The normal buttons have the same coordinates.
But the troubled buttons will have different coordinates for three highlight areas.
This is where it’s causing problems. Apparently the compiled projects will set the Highlight area 2&3, instead of the supposed Area 1.

The solution to solve this problem is to delete the highlight entirely, and do it from scratch.
Correction 10-03-2009:
Looking more into this issue, I think it’s not related to DVDMaestro->Scenarist conversion, but a rather button group problem. The hightlight area seems to corresponds to the button group. DVD allows three button groups, so each highlight area links to each button group. The problem arises when after making the button highlight coordinates, if you drag the area around, it will mess up, because dragging the area seems always changing only the highlight area No.1. So if your button group is assigned to 2, the corresponding highlight area No.2 is still the original coordinates!
The EASIEST solution to solve this problem is to delete the highlight entirely, and do it from scratch, and DO NOT change anything thereafter.
5. Multiangle - the non-seamless way
This is more like encoding guideline for Canopus Procoder. I used to just use CCE to do any multi-angle encodes. Later I had success with Sonic CineVision with their guideline. But I've never tried using Procoder. So finally I took some time and played around with it.
The basic things for multi-angle encoding is to use closed GOP, CBR, disable scene detection, and make the angles same picture structure.
CCE has a multi-angle template:

Procoder settings:

Non-seamless angle in Scenarist:

The only thing different from the seamless angle (default) is to click on scenes, and pick Non-seamless drop down in property browser. By doing this, now you can add different audio and subtitle tracks to different angles, as long as the corresponding audio and subtitle has the exact parameter. The final result is when switching the angle, the audio and subtitle also switch automatically. Blu-ray has this non-seamless property by default.
6. Random, shuffle PGCs


To be continued…?


1. Easy timing, ctrl+c for start, ctrl+v for stop, yes it's that easy
2. Can change the FPS on the fly, this is a very essential function for DVD production
3. Easy delay adjustment
4. Has a video player supports quite a few video/audio formats including mkv
5. Error detection such as long sentences, time collision, etc...
6. Vast subtitle formats output, almost any DVD authoring tool, you name it!
There are also three major shorcomings:
1. Only supports ANSI codes, no unicode support
2. Doesn't support advanced SSA/ASS script such as karaoke, and truncate any of those codes when importing!
3. Can not show subtitles with time collison, only the first one will show
Here is a screenshot for subtitle workshop:
Bottom line:
If you intend to produce home-brew DVDs, this is a must have! (in conjunction with maestroSBT)
Aegisub:
This is a relatively new tool, but it's already been widely used by Fansub groups (but not so popular in China since people got another tool called popsub, originally developed by kuti from popgo forum - a forum dedicated for fansubbing, probably one of the biggest fansubbing distributor in China). Back to Aegisub, it's really powerful, and more oriented towards fansubbing (specifically ASS as what the faq said) since its outstanding supports for SSA/ASS advanced scripts. I have only been playing around this tool recently, and start to like it more and more, most importantly it has all the essential functions from subtitle workshop.
It has the following features which I liked:
1. Can read subtitles directly from mkv file
2. Can extract sound from mkv file and show the waveform for easier timing, also has supports for a few video/audio formats
3. It can convert framerate as export to a new file, not as convenient as subtitle workshop, but it's there...
4. Unicode support
5. Has internal spell checking
Again there are cons:
1. Supports ASS format exclusively, no other format output...
2. Very powerful, but not as intuitive, has a bit learning curve
3. No on-the-fly framerate change
Here is a screenshot for Aegisub:
Here is a screenshot for Aegisub with wav spectrum read directly from mkv file:
Here is the exporting menu, framerate can be changed here only:
Bottom line:
A powerful software designed for fansubbing, not the easist to use, great support for mkv and ASS.
Well, here are some simple settings that will speed up the syncing process a bit:
So basically I mapped the most used keys from F1 to F5. F1 go back a line, F2 play the current line, F3 go next line, F4 commit change and stay current line, F5 play last 500ms. The tradeoff to this settings is that I’m currently losing “2” on the big keyboard area, but it’s still accessible on keypad.
Next is to set the highlight line in yellow, which makes current line stands out better than the original lake bluish color.
MaestroSBT:
This is not really a subtitle timing tool, but rather a subtitle rendering tool. So the timing part has to be done in other sofrware. The development has been halt for 2 years, the last build is 2.6.0.0 released back in 2005. It is designed for advanced DVD authoring tool such as DVDMaestro or scenarist, but can also be used for free tools such as muxman.
It has the following great features:
1. Supports unicode and ANSI (can save files with foreign character with unicode though)
2. Supports multiple styles, thus can have different fonts/colors (colors are limited at three at the same time if no boarder, two at the same time if has boarder due to the limitation of DVD spec)
3. Supports subtitles with time collision (reported bug used with muxman though)
4. Supports 16:9 subtitles with aspect ratio corrected (even on some commercial DVDs we still see squashed subtitles!)
5. Supports Frame input and output for NTSC non-drop frame
6. Multiple resolution support, can even custom resolution
There are also two cons:
1. As a great software for DVD, it is a bit outdated for rendering high definition subtitles although doable but only with awfully four colors... This software hasn't been updated for more than two years now!
2. Need to set files, timing every time loaded, a liitle bit inconvenience...
Here is a screenshot for MaestroSBT:
The software supports both unicode and ANSI, but when dealing with scripts with foreign characters from subtitle workshop (ANSI), have to convert the file to unicode, or MaestroSBT will just report save failure... For pure English characters, unicode and ANSI both work fine. It takes me a while to figure out this useful feature(button)...
It can output different resolution, and has fix for 16:9 widescreen DVDs, normally you have to render two different subtitles for widescreen DVDs, one for 4:3, one for 16:9. If only one is done, the subtitle will look ugly squashed either in a 16:9 TV or a 4:3 CRT TV depends which one is missing...
Framerate input and output control, for NTSC non-drop frame, the input is always 29.97 and output is 30, or the subtitle won't match the video/audio; if dropped frame, input and output should both be 29.97.
This is where the software really shines, multiple styles and time collisions make the DVD subtitle look actually a bit like SSA/ASS on computers, no karaoke support though.
This is how the new file (2.ssa) compares with the old file (1.ssa), even all the position info are saved (not in the screenshot):
Bottom line:
Must have software if you want to have a professional looking DVD! Hope there will be some updates (better rendering quality) when the high definition authoring are more adopted to the public.
Avs2bdnxml v1.13
This tool was written by ps-auxw from doom9. It took us almost a year to fix all the bug and add some advanced features that no where to be found on even some of the commercial software. So here is the final version v1.13 which is the first version that can generate very decent Blu-ray pictures without much bug as far as my testing goes. Where it shines is its support for ssa/ass format. Unlike MaestroSBT, this tool uses vsfilter to generate its subs, so there’s no conversion. Everything from the ssa/ass side is preserved. But this is also where the problem occurs since Blu-ray doesn’t have big enough decoding buffer (4MB) to accommodate the pictures it generate. This tool generates pictures by detecting any changes from the vsfilter, so if there’s constantly rapid changing of color or position, it will generate picture frame by frame which Blu-ray don’t like.
It has the following great features:
1. Supports 8bit 256 color png or 32bit true color png.
2. Supports non-drop time frame automatically, does NOT support drop time frames.
3. Can do picture cropping and dual window slicing which are very important features for Blu-ray buffer optimization.
4. Can do splitting to specified frames to improve video time searching (only found on Japanese releases).
5. Works extremely well with Aegisub and Sonic Scenarist BD.
Cons:
1. The ssa/ass format pragmatic approach is NOT very compatible for Blu-ray, so users have to be aware of the limitations in order to not overflowing the buffer.
2. Dos only, no GUI.
3. Deank’s easySUP trying to integrate this with BDSup2Sub which the latter CANNOT generate Blu-ray subpictures correctly. But unfortunately very few people know the true limitation of BDSup2Sub. It’s a big disservice to avs2bdnxml with good intention.
4. Cannot generate *.sup which also hinders its usage (not everyone is using or willing to learn how to use Scenarist BD…)
Final thoughts:
So here are the FOUR software I've been using, they are all great software thanks to the authors.