Showing posts with label DVD/BD Tutorials. Show all posts

Sunday, November 13, 2011

6 Scenarist (SD DVD) mysteries decode 11-13-2011 Update


11-13-2011 Update – adds 16:9 subpicture mapping bug workaround.

0. 16:9 subpicture mapping bug – how to avoid?

When you have a 16:9 widescreen project, your subpicture mapping will get screwed. Subpicture may not show in widescreen or letterbox mode. This is a well known bug in Scenarist. Here is the workaround.

Scenarist 169 custom subp stream 0_thumb[10]

In the mean movie, you need to specify the subpicture for widescreen and letterbox by pressing down the W or L button. The default is always W button. Normally you would have to supply two separate subpicture streams for both W and L. But now with the decreasing number of CRT sets out there, a quick way to do this is to supply one widescreen correct rendered stream for both W and L. This is achieved by just pressing both W and L for the same stream.

Scenarist 169 custom subp stream 1_thumb[2]

Now select the VTS in Scenario Editor. In the “Subpicture Availability Flag Policy”, change it to to “Custom”. Now the available subpicture streams will be shown. In the example, there are two subpicture streams, one for English, one for Chinese.

Scenarist 169 custom subp stream 2_thumb[2] 

Select the PGC of the main movie. Double click “Subpicture Attribute”. Here there are two items listed corresponding to the streams previously set in VTS. Double click the first “PGC Sub-Picture Attr” item. For Decoding Stream Number for Widescreen, check 0 English (wide & Letter); For Decoding Stream Number for Letterbox, check 0 English (wide & Letter). This will map the subpictures 1 to both widescreen and letterbox mode. This means when you view the disc on widescreen TV, the subpicture for the widescreen mode will be picked up; when you view the disc on 4:3 Letterbox CRT TV, the subpicture for the letterbox mode will be picked up. Do the same thing to the second “PGC Sub-picture Attr” item, but change the subpicture to Chinese ones.

image

After muxing, you’ll see the results.

This is the quick way to do, but if you want  to follow the 16:9 corrected subpicture for 16:9 mode and 4:3 corrected subpicture for 4:3 mode rigorously, you have to supply two subpicture streams and map them correctly.


1. Audio/Subtitle Language Code Extension – how to?

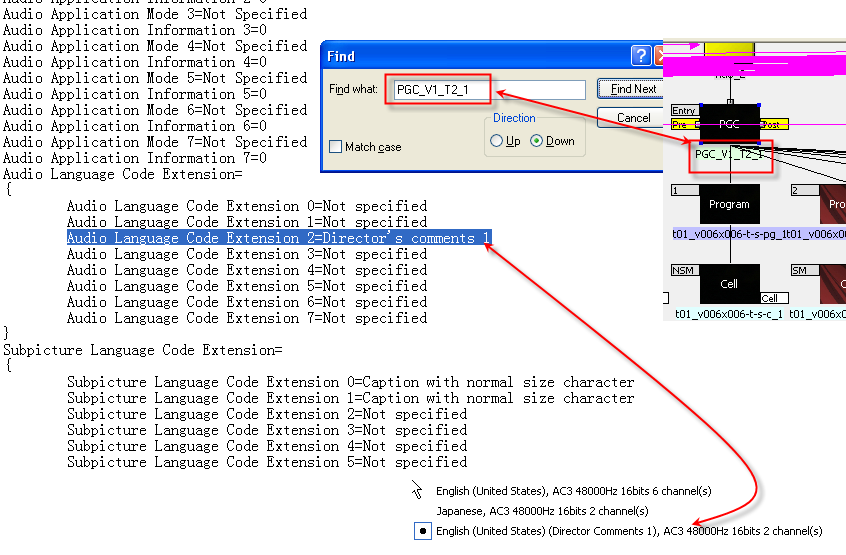
Sometimes when you play a DVD in software players (PowerDVD, winDVD, etc), you’ll notice that the audio has more than the regular information (AC3, DTS, etc), the audio also shows if it’s a auido commentary, or a captions, etc. The same goes for subtitles. So how do you do this?

The painful way is to edit the *.scp project file, to get *.scp file, you need to export the project first…


ENLARGE


The easy way is to edit in scenario editor. Click on the VTS, in Property Browser, you’ll see "Audio language code extension” and “Subtitle language code extension”, double click those, you’ll get to see those settings via drop down menu.

Note: this editing affects all the titles under VTS. So if you don’t want other titles to have these properties, you’ll need put those under a different VTS.


2. Push the disc’s size boundary, where’s my layer break?

Once your project size is over 8GB, scenarist starts to go “red” on layer 0 and layer 1. It’s more of estimation, you can ignore the reds, and still add stuff. But each layer has to be around 4.20GB, that’s the limit of layers. If you go over 4.20GB on each layer, your project is over size. If you choose OTP, then Layer 0 must be bigger than Layer 1. But how much bigger? Scenarist will give you a wrong impression that as long as Layer 0 is bigger than Layer 1, that’s OK. But in reality, to get a valid layer break, Layer 0 need to be at least 0.04GB bigger than Layer 1 to be safe, also when you use lots of still images, the estimation is extremely inaccurate, still images (browseable slides usually take less space then the estimation)

The real layer break can be seen easily using Rom Formatter.

Per the Imgburn, an empty Verbatim 2.4X DVD+R DL will have 2,086,912 sectors on each layer. When you compile the project, scenarist will give you the correct layer size (in information Browser - Build) as sectors as well. Add 16 sectors on top of that (Imgburn does the 32K padding to ifo/bup automatically), that’s your real layer break in Imgburn. In this case as shown above, scenarist indicates layer 1 starts 2084144, add 16, you get 2084160, that’s your real layer break which is still under the maximum 2086912, so that you can burn with no worry.


3. How to put PC files on the same disc?

Photobucket

Photobucket

Photobucket

Photobucket

The DVD file system is actually more complicated than Blu-ray’s UDF 2.5, UDF 2.6. The added Joliet supports foreign characters, also characters longer than 8.


4. Wrong button mapping although previews fine in simulator window

Photobucket

so this new problem is the most recent one that I’ve discovered. I’ve been scratching my head about this weird issue. This seems to be only happening on my new authoring machine (dual core), I’ve never had this problem on my old notebook (single core).
Finally I was able to pinpoint the problem last night.

This issue arises from when modifying couple projects demuxed by DVD Reauthor Pro, while the original discs are compiled using DVDMaestro. Using scenarist, while the menus previewed fine, the compiled projects have messed up button mapping. Above picture as viewed in PGCEdit. The left column, from top to bottom, supposed to be 1,2,3,4, but the last button now is #6! Also the button routing information is messed up.


Photobucket

So in scenarist, you can choose to view the button properties.

Photobucket

The normal buttons have the same coordinates.

Photobucket

But the troubled buttons will have different coordinates for three highlight areas.
This is where it’s causing problems. Apparently the compiled projects will set the Highlight area 2&3, instead of the supposed Area 1.

The solution to solve this problem is to delete the highlight entirely, and do it from scratch.

Correction 10-03-2009:

Looking more into this issue, I think it’s not related to DVDMaestro->Scenarist conversion, but a rather button group problem. The hightlight area seems to corresponds to the button group. DVD allows three button groups, so each highlight area links to each button group. The problem arises when after making the button highlight coordinates, if you drag the area around, it will mess up, because dragging  the area seems always changing only the highlight area No.1. So if your button group is assigned to 2, the corresponding highlight area No.2 is still the original coordinates!

The EASIEST solution to solve this problem is to delete the highlight entirely, and do it from scratch, and DO NOT change anything thereafter.


5. Multiangle - the non-seamless way

This is more like encoding guideline for Canopus Procoder. I used to just use CCE to do any multi-angle encodes. Later I had success with Sonic CineVision with their guideline. But I've never tried using Procoder. So finally I took some time and played around with it.

The basic things for multi-angle encoding is to use closed GOP, CBR, disable scene detection, and make the angles same picture structure.

CCE has a multi-angle template:

CCEmultiangle1

Procoder settings:


Non-seamless angle in Scenarist:

The only thing different from the seamless angle (default) is to click on scenes, and pick Non-seamless drop down in property browser. By doing this, now you can add different audio and subtitle tracks to different angles, as long as the corresponding audio and subtitle has the exact parameter. The final result is when switching the angle, the audio and subtitle also switch automatically. Blu-ray has this non-seamless property by default.


6. Random, shuffle PGCs

Photobucket
 
To make PGCs random or shuffle is not that hard, but this is my first time to deal with it. So I just need to mention a few important points. First the term “Repeat Times” here is very confusing, what is really means is how many programs you want this PGC to play. PGCEdit actually got the same term as what I think the best.
 
Photobucket
 
Note that the number of programs you want to random or shuffle needs to be “+1” if you want a complete loop (that is to cover every program to play once in shuffle mode) So say if you got 62 programs and you want all programs to play at least once in shuffle mode, you need to put in 63 (62+1) in the “Repeat Times” field.
 
Photobucket
 
During my authoring, I got this error message "The first Program must be set as a Chapter if the PGC is in random or shuffle mode.” For some reason, my PGC was messed up with no chapter number (the little number 1, 2, 3 as shown in the upper part of the picture). But for a valid random, shuffle PGC, it needs one chapter number on the first program as seen in the lower part of the image. The rest Programs don’t have numbers! My solution to solve the error was to completely remove all programs, and add them back. Thankfully the setting retains.

To be continued…?

Thursday, July 28, 2011

Scenasrist BD, x.264, qpfile chapter points


So I’ve been doing some experiments with x.264 encoding for Scenarist BD. I’ve been encoding with x.264 for a while, but pretty much for subtitling purpose since playback on raw BD while subbing is still too much to ask, even for my 1st gen i7 setup. And for professional production, I’ve been using Sonic CineVision 100%. Not that I’m super satisfied with the result, I can’t seem to find a better choice. But for anything under 10Mbps, the performance is really terrible.

So I decided to try x.264 by following this site. It’s pretty self explanatory. The only difficulty is putting the chapter marks on I frames. CineVision and Scenarist BD use very similar *.csv format for chapter marks, while x.264 requires qpfile which is somewhat different. The former ones use HH:MM:SS:FRAME#, and they have to be 24000/1.001 sped up ones (have to do 23.976->24 fps conversion, same goes for 30fps 30000/1.001), while qpfile uses total frame#. My NLE software is SONY Vegas, and I use frameserver as output, then create avs file, finally serve into megui. Unfortunately, this route doesn’t honor the chapter marks set in Vegas. So the qpfile is required. And if the chapter marks don’t match, you’ll get warnings in Scenarist BD (exact wording: PlayListMark is not an I-Picture). Although this is allowed in BD spec, you’d always want the chapter marks to be on I frame. In my experiment, the timecode in Vegas matches Scenarist BD format. SO here is what I’ve been doing:

Sample *.CSV file for CineVison is:

image

The timecode is copied from Vegas:

image

Same clip, just change the time format in Vegas, then copy it to a newly created qpfile (with notepad *.qpf):

image

0 K -1
4882 K -1
7075 K -1
10660 K -1
11062 K -1
14824 K -1
17700 K -1
21357 K -1
23359 K -1
25134 K –1

As for the timecode in Scenarist BD, you can use *.csv or *.tsv. The former is simpler, while the latter supports chapter name. The difference here between CineVision and Scenarist BD is that in Scenarist, you have to specify framerate and nondrop or drop frame.

Timecode Format    23.976    NonDrop   
Chapter Number    Timecode    Chapter Label    Mark Type
1    00:00:00:00       
2    00:03:23:10       
3    00:04:54:19       
4    00:07:24:04       
5    00:07:40:22       
6    00:10:17:16       
7    00:12:17:12       
8    00:14:49:21       
9    00:16:13:07       
10    00:17:27:06       
11    00:18:19:19       
12    00:20:31:05       

So for timecodes directly from Vegas, there’s no need to do frame conversion, but frames from DVD ifo or BD mpls files, it’s very likely that frame sped up is needed.

Wednesday, April 27, 2011

Scenarist BD – Clip, Stream (PlayList), IN/OUT Time Explained


So here I did it again, another masterpiece from me! It’s expanded from a pm from certain forum.

Photobucket 

The Clip is the item at the bottom, and PlayList (Stream) at the top. When you add multiple clips into PlayList, it will create multiple PlayItem.

 
Photobucket
Things in Clip counts toward the disc space; while PlayList is virtual, no matter how many you created, it doesn't add space.

BD Reauthor cannot reset the time to 00:00:00:00. The time is ripped as is. However, if you remove stuff from PlayList and Clip, you can reset individual asset to zero. But you should never do this in reauthoring since there are probably other things like commands are referring to these PlayLists... An easier way is to use the time->video offset on Clip. This is usually needed for subtitles only.

More info on IN/OUT time:

Photobucket

By default, IN/OUT time are not set, unless your clip is set from the original disc. You can set IN/OUT time at both the Clip and PlayList level. If you set at the Clip level (Time->Duration), the clip and the playlist will both reflect the time you set. In Clip, you should see some yellow box saying "TIME", in PlayList, you should see the total playtime shortened. By setting IN/OUT time in Clip, you are essentially "trimming" the video and audio. You lose playback time and waste disc space by doing this. However, it is sometimes useful for seamless branching to ensure the audio and video have the exact same length to avoid the "no clean break" error. (Audio needs to be half second longer than video). But usually only the end couple frames is all you need to trim in this case.

Photobucket

The more common way to set IN/OUT time is at PlayList level, where you can create one playlist playing the whole footage, another playing only part of it without putting two versions of the same movie on disc (Clip).

Wednesday, January 19, 2011

Blu-ray ISO Mounting, Burning and Playback Guide 20100119 Update


Since I’ve been fiddling around different software for the past two days, I’m semi-happy with what I got so far. I’ll just summarize my experience.
My system is still winxp SP3, it’s relatively old for multimedia purpose, but still kicking.

The Blu-ray playback software:

powerdvd8

1. PowerDVD 8 Ultra version 2217a with HD-DVD add-on.
2. TotalMedia Theatre 3 with SimHD plugin. (TMT3 for short)
3. WinDVD 9.

TMT3

I have achieved playing actual discs with all three software via a Lite-on BDROM. For playback quality, my preference is: PowerDVD (Hardware Acceleration [HA] on; well, powerDVD always turns on HA for Blu-rays, you can’t turn it off since version 8)>WinDVD 9 (HA on)>TMT3 (HA OFF). PowerDVD gives the best visual quality, but BDMV folder playback and image capture function are disabled on build 2217a; while I didn’t spent too much time on winDVD 9 since it doesn’t do anything; TMT3 can play BDMV folder directly, plus it can capture images as long as the disc has no AACS protection (can capture images from Blu-ray ISO). But TMT3’s video quality is definitely the worst among the three, even after turning off hardware acceleration; with hardware acceleration on, the video quality is even worse, any still images will show aliasing lines, and the DVD playback is totally crapped out! So for serious viewing on PC, powerDVD is the way to go, TMT3 is only good for its functions, winDVD is somewhere in the middle…

For mounting Blu-ray ISO without a physical discs, first you’ll need that famous UDF2.50 reader if you are still using winxp. powerDVD has no problem with either Alcohol 120% or Virtual CloneDrive. TMT3 don’t like Alcohol 120%. After reading around online, I think I found the explanation:

Photobucket

Emulation from Alcohol puts Blu-ray ISOs as a giant DVD-ROM, while from Virtual CloneDrive regards them as a BD-R; although when building the images in Imgburn, I think Imgburn still treat them as DVD-ROM.

Photobucket

Obtaining Blu-ray ISO:
So far, only two pieces of software are easy to use: AnyDVD HD and DVDFab HD Decrypter. AnyDVD HD can work on-the-fly, while DVDFab only works on dumping files to hard drive. After obtaining BDMV folder from the disc, the best option is to make ISO using Imgburn (I think AnyDVD HD can put ISO file directly). The reason I don’t like BDMV folder is because Blu-ray file structures are quite complicated, I don’t want to mess them up, this is especially important if you want to process m2ts in tsmuxer, eac3to later on; making an ISO will make the files read-only and not writable within the ISO so that you won’t mess up the original structure. The drawback to this is that you cannot put a srt/ssa/ssa subtitle file under the “stream” folder, load up mpc/Kmplayer/Potplayer to play the streams with subtitles. But currently the all these multimedia players are still poor at handling raw m2ts streams if there’s Dolby TrueHD and DTS-HD MA advanced codecs, I wouldn’t worry too much of losing this convenient feature.

Before burning, to make the ISO playable in software players such as PowerDVD, you’ll need to have a complete Blu-ray structure:

BDMV
-----AUXDATA
-----BACKUP
------------BDJO
------------CLIPINF
------------JAR
------------PLAYLIST
-----BDJO
-----CLIPINF
-----JAR
-----META
-----PLAYLIST
-----STREAM
CERTIFICATE

More info HERE.

So to summarize all the above, here is the procedures:

PC:

Original Disc->AnyDVD HD(can handle BD+)/DVDFab HD->BDMV->(Complete Blu-ray structure if folders are missing)->IMGBURN UDF2.50 making ISO+MDS/BDISO->Alcohol 120% / Virtual CloneDrive mounting->PowerDVD 8 2217a HA on / TMT3 HA off (specifically used for Title/Pop-up menu captures).

PC with additional subtitle without losing menu:

It is possible at the moment with BDMV titles, some people report that they have successfully muxed in audios and subtitles into m2ts and tricked clipinf files to have a valid stream. I haven’t tried the guide yet.

PS3 without subtitle:

Mounted BDISO->TVersity with transcoding off+add BDMV folder to share->PS3 (only works on simple m2ts with LPCM, poor at handling complex Dolby TrueHD and DTS-HD MA)

PS3 with additional subtitle:

Mounted BDISO->tsmuxer with srt subtitle/4GB cut->FAT32 USB drive->AVCHD manager/AVCHDme->PS3 (no restriction, but menu is lost).

Maximum size for blank Blu-ray discs:

BD-R
12,219,392 Sectors
25,025,314,816 bytes = 24,438,784 KB = 23,866 MB = 23.31 GB

BD-RE
11,826,176 Sectors
24,220,008,448 bytes

BD-R DL
24,438,784 Sectors
50,050,629,632 bytes
46.61 GB

BD-RE DL
23,652,352 Sectors
48,440,016,896 bytes

"If the disc is formatted with what's known as 'spare areas' for error correction etc (part of the blu-ray standard), that size will be smaller still.”

http://forum.imgburn.com/index.php?showtopic=8315

Imgburn to turn on spare areas:

Tools-->Settings-->Write-->Prefer Format Without Spare Areas (versions after 2.4.3.0 has this on as default)

Here goes the 122509 update:

A little bit about the players troubleshooting, mainly for TMT3 going explode (causing PC immediate reboot, no BSOD, not even a chance for memory dump). So this is the third time I got hit by this, last two times I got away from it by reinstalling winxp because I did have a reason to, but this time I definitely DO NOT wish to reinstall. So I did a bit research online, and found out I’m NOT alone. The only difference is that some users were speculating about hardware+driver deficiency, while my situation is that it occurs when I installed Canopus Edius NLE on my system (so more like pure software incompatible).

Here’s the procedure I solved the problem this time:

Uninstall Canopus Edius
Uninstall Canopus codec
Uninstall TMT3 completely (manual register and folder cleaning required, see below for details)
REBOOT
Install Canopus
Install TMT3 –> Reboot –> Update to latest .160 version as of this writing –> Reboot

And miracle did happen when I did the above steps.

Details on how to clean uninstall TMT3:

Step 1: Please uninstall the program in the Control Panel. If you have other ArcSoft programs installed, please uninstall them too. Then delete the program files in "C:Program FilesArcSoftTotalMedia Theatre" folder (the installation directory).
Step 2: Delete all the files and the folders (including the hidden ones) in "C:Users<username>Application DataArcSoft" and "C:Program FilesCommon FilesArcSoft" folders.
Step 3: Double check "archlp.sys" in "C:WINDOWSsystem32drivers" has been deleted, if not, please deletes it manually.
Step 4: Clean up the registration files:
1).Go to the Vista Start menu and click in the Start Search Dialog Box, type "regedit" and press Enter.
2).Delete "[HKEY_LOCAL_MACHINESOFTWAREArcSoft]" and "[HKEY_CURRENT_USERSoftwareArcSoft]" these two nodes.
Step 5: Reinstall TMT after rebooting the computer.

http://cid-6e8f6dc16096cb25.skydrive.live.com/embedicon.aspx/TheFiles/TMT_TroubleShootingGuide.pdf

Reference Links:

http://www.avsforum.com/avs-vb/showthread.php?t=1118509
https://ssl.arcsoft.com/forum/forum_posts.asp?TID=1359&PID=6030
http://www.arcsoft.com/forum/forum_posts.asp?TID=1642&PN=3

File system:
For cars mp3 CD:

change the filesystem to ISO9660 + Joliet

Joliet is what most standalones will look for when playing MP3 / DivX discs.

Use UDF when you're burning DVD Video / HD DVD / Blu-ray discs.


Here goes the 01192011 update:

pioneer BDR-206_reg

So at the beginning of 2011, I finally bought a Blu-ray writer - Pioneer BDR-206. Actually, I got the retailed BDR-2206, which comes with Blu-ray playback software PowerDVD and an extra case. Otherwise it’s exactly the same as the OEM BDR-206. I was a bit disappointed to find out even the 2206 didn’t include power and SATA cables. BDR-206 is more like a price-down re-release of last year’s BDR-205 rather than introducing something new. Well, there’s the BDR-206MBK which is world’s first BDXL 128GB quod layer writer… Here are some initial impression.

To go along with the writer, I ordered 5 Mitsubishi BD-RE DLs and 3 Sony BD-RE SLs on ebay which shipped from Japan, rather than going with the domestic ones which one BD-RE DL will cost a ridiculous fortune. Majority of my projects are BD50’s, I have very little use of BD25 discs.

mitsubishi bd-re dl

For the BD-RE DLs, I was able to get the original packaged Mitsubishi 5 pack. The discs come with a media code TDKBLD-Wfa-000. I was a bit disappointed and was worried about the compatibility with my Playstation 3 since I read online that this specific media code doesn’t go along with the launch 60GB Playstation 3 well. But fortunately, everything went extremely smooth, I was able to play it without any problem. I’ve watched two movies all the way through without any problem. The first time of using requires a full format which takes as long as writing the discs to full which is 90 min. The data verification process takes about half of the time at 45 min. And as the instructions about imgburn above, I burned these discs with spare area without any problem.

sony bd-re

For the Sony BD-RE SLs, I bought the re-packaging ones. These come with packaged without the case. I have no problem using these either, everything went smoothly. But I have to admit worrying about the legitimacy of these discs at first. The disc media code is SONY-ES1-002, which I believe are the same as the ones sold in US. The burning process takes exactly half of the time as BD-RE DLs since BD-RE SLs are exactly half of the size unlike DVD 5 vs DVD 9.

I’ve also burned some CDs and DVD 5s using this writer, and everything is smooth, but I’ve only got verbatim ones, can’t test anything else.

Lastly, some testings on my projects so far:

PS3_BD-RE testing1

1. The projects authored in Scenarist BD has a very GOOD compatibility in PS3’s compatibility. There’s a playlist with PIP and always-on menu I had in the project, I could never get this to work in PowerDVD 10 various patches and TMT3/5, Sonic’s Scenarist QC worked to some extent, but it runs exactly as I intended in PS3! Other navigation stuff all worked correctly which exceeds my expectation. Since PS3 DVD’s playback has some quirks, I’m a bit overjoyed.

2. The current top menu audio switching isn’t very smooth, I need to change it to switch at the end of the playlist rather than switching right away.

3. The picture in the metadata, as shown above, needs to have much larger texts. The two picture size are only 640*360 and 416*240.

4. Return button might need to use a second button in BOG to turn off popup menu, otherwise the menu would stick on screen until the title is jumped.

Thursday, October 14, 2010

Blogger DVD/BD Tutorials Page


So I decided to start this page by posting some of my tutorials, all of these will be regarding Sonic’s Scenarist (DVD) and Scenarist BD packages. Currently there is only one post. But I have posted ALL of my knowledge on the other Chinese forum. I think I’ll try to translate those into English and make them into PDF and post them here.


General:

Blu-ray ISO Mounting and Playback Guide with BD capacity (122509 Update Player Troubleshooting)
Current State of Blu-ray Authoring/Modification
PS3 DLNA software comparison: TVersity vs PS3 Media Server
Playstation 3 does NOT support DVD SPRM4 register !!! (Verified on the US fw 2.70)
How to deal with tsMuxeR's AV frame too large error.


My Special Expertise – Subtitle:

Current state of Blu-ray Subtitle Rendering Software

Subtitle Software Bundle Part I - Four subtitle software I've been using for original creation/modifying ((09052010 update)
Subtitle Software Bundle Part II - Two subtitle software for getting subs from the original DVD or fansub Ver.2 (08242010 update)


DVD Tutorials:

6 Scenarist (SD DVD) mysteries decode


BD Tutorials:


Other Resources: