11-13-2011 Update – adds 16:9 subpicture mapping bug workaround.
0. 16:9 subpicture mapping bug – how to avoid?
When you have a 16:9 widescreen project, your subpicture mapping will get screwed. Subpicture may not show in widescreen or letterbox mode. This is a well known bug in Scenarist. Here is the workaround.
![Scenarist 169 custom subp stream 0_thumb[10]](https://blogger.googleusercontent.com/img/b/R29vZ2xl/AVvXsEjqdCiRpk9hH8-_oyKPNNuig5MYDYYgpzK2xbJdkL2iYdtKNkccWaFeXYZwx_GVw0XsvhSeXwZyvZjmvV-kyVb2pvH8zjj79uxKEdnMJBnl5KzchjlXW6IP_NHMRfz_B9gB4eDyZx3OnpQ/?imgmax=800 "Scenarist 169 custom subp stream 0_thumb[10]")
In the mean movie, you need to specify the subpicture for widescreen and letterbox by pressing down the W or L button. The default is always W button. Normally you would have to supply two separate subpicture streams for both W and L. But now with the decreasing number of CRT sets out there, a quick way to do this is to supply one widescreen correct rendered stream for both W and L. This is achieved by just pressing both W and L for the same stream.
![Scenarist 169 custom subp stream 1_thumb[2]](https://blogger.googleusercontent.com/img/b/R29vZ2xl/AVvXsEgsQ6r3z_H4LwXdYxuIq0A7EJjOZi1lA1mH5BFtbxbsLX7ETUEgafS8az52yMqH-0uB33osOiHOP6DdHgCaNTyivYbD_vTCno1re8Z78vC5Hzti4jJagvfP5SKgVt8RoXjjx21ev056IeU/?imgmax=800 "Scenarist 169 custom subp stream 1_thumb[2]")
Now select the VTS in Scenario Editor. In the “Subpicture Availability Flag Policy”, change it to to “Custom”. Now the available subpicture streams will be shown. In the example, there are two subpicture streams, one for English, one for Chinese.
![Scenarist 169 custom subp stream 2_thumb[2]](https://blogger.googleusercontent.com/img/b/R29vZ2xl/AVvXsEg5CwG-_AXJKrNkQxu5mf01TNK-jqFGASetTOzaR_k1Sqg6V2VDDMruslQ-pYzLn8Ea5K4SFQ4v6A1veph7I9YzJitldHOHPuQrX9kv23jJGTUJHGaLTm6rta80X8eb-_PCGAzbqrwnODA/?imgmax=800 "Scenarist 169 custom subp stream 2_thumb[2]")
Select the PGC of the main movie. Double click “Subpicture Attribute”. Here there are two items listed corresponding to the streams previously set in VTS. Double click the first “PGC Sub-Picture Attr” item. For Decoding Stream Number for Widescreen, check 0 English (wide & Letter); For Decoding Stream Number for Letterbox, check 0 English (wide & Letter). This will map the subpictures 1 to both widescreen and letterbox mode. This means when you view the disc on widescreen TV, the subpicture for the widescreen mode will be picked up; when you view the disc on 4:3 Letterbox CRT TV, the subpicture for the letterbox mode will be picked up. Do the same thing to the second “PGC Sub-picture Attr” item, but change the subpicture to Chinese ones.

After muxing, you’ll see the results.
This is the quick way to do, but if you want to follow the 16:9 corrected subpicture for 16:9 mode and 4:3 corrected subpicture for 4:3 mode rigorously, you have to supply two subpicture streams and map them correctly.
1. Audio/Subtitle Language Code Extension – how to?
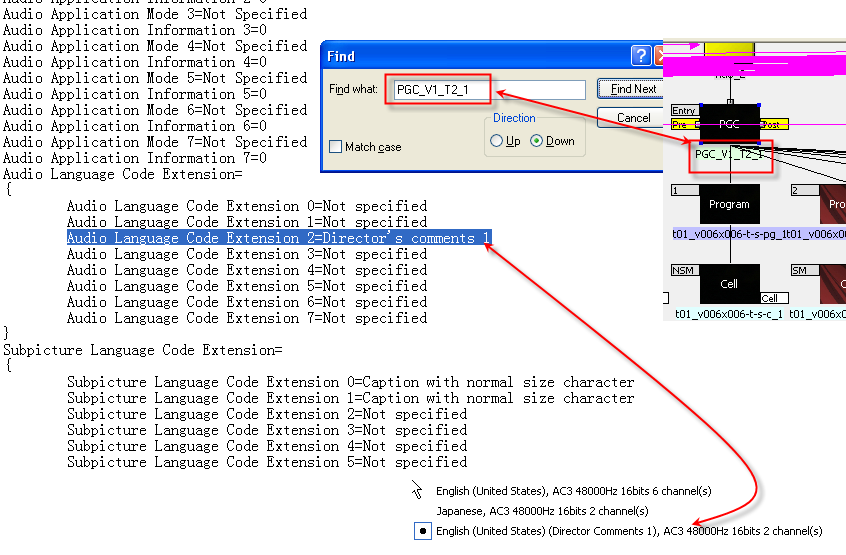
Sometimes when you play a DVD in software players (PowerDVD, winDVD, etc), you’ll notice that the audio has more than the regular information (AC3, DTS, etc), the audio also shows if it’s a auido commentary, or a captions, etc. The same goes for subtitles. So how do you do this?
The painful way is to edit the *.scp project file, to get *.scp file, you need to export the project first…

ENLARGE
The easy way is to edit in scenario editor. Click on the VTS, in Property Browser, you’ll see "Audio language code extension” and “Subtitle language code extension”, double click those, you’ll get to see those settings via drop down menu.
Note: this editing affects all the titles under VTS. So if you don’t want other titles to have these properties, you’ll need put those under a different VTS.

2. Push the disc’s size boundary, where’s my layer break?

Once your project size is over 8GB, scenarist starts to go “red” on layer 0 and layer 1. It’s more of estimation, you can ignore the reds, and still add stuff. But each layer has to be around 4.20GB, that’s the limit of layers. If you go over 4.20GB on each layer, your project is over size. If you choose OTP, then Layer 0 must be bigger than Layer 1. But how much bigger? Scenarist will give you a wrong impression that as long as Layer 0 is bigger than Layer 1, that’s OK. But in reality, to get a valid layer break, Layer 0 need to be at least 0.04GB bigger than Layer 1 to be safe, also when you use lots of still images, the estimation is extremely inaccurate, still images (browseable slides usually take less space then the estimation)
The real layer break can be seen easily using Rom Formatter.

Per the Imgburn, an empty Verbatim 2.4X DVD+R DL will have 2,086,912 sectors on each layer. When you compile the project, scenarist will give you the correct layer size (in information Browser - Build) as sectors as well. Add 16 sectors on top of that (Imgburn does the 32K padding to ifo/bup automatically), that’s your real layer break in Imgburn. In this case as shown above, scenarist indicates layer 1 starts 2084144, add 16, you get 2084160, that’s your real layer break which is still under the maximum 2086912, so that you can burn with no worry.
3. How to put PC files on the same disc?

The DVD file system is actually more complicated than Blu-ray’s UDF 2.5, UDF 2.6. The added Joliet supports foreign characters, also characters longer than 8.
4. Wrong button mapping although previews fine in simulator window

so this new problem is the most recent one that I’ve discovered. I’ve been scratching my head about this weird issue. This seems to be only happening on my new authoring machine (dual core), I’ve never had this problem on my old notebook (single core).
Finally I was able to pinpoint the problem last night.
This issue arises from when modifying couple projects demuxed by DVD Reauthor Pro, while the original discs are compiled using DVDMaestro. Using scenarist, while the menus previewed fine, the compiled projects have messed up button mapping. Above picture as viewed in PGCEdit. The left column, from top to bottom, supposed to be 1,2,3,4, but the last button now is #6! Also the button routing information is messed up.

So in scenarist, you can choose to view the button properties.

The normal buttons have the same coordinates.

But the troubled buttons will have different coordinates for three highlight areas.
This is where it’s causing problems. Apparently the compiled projects will set the Highlight area 2&3, instead of the supposed Area 1.
The solution to solve this problem is to delete the highlight entirely, and do it from scratch.
Correction 10-03-2009:
Looking more into this issue, I think it’s not related to DVDMaestro->Scenarist conversion, but a rather button group problem. The hightlight area seems to corresponds to the button group. DVD allows three button groups, so each highlight area links to each button group. The problem arises when after making the button highlight coordinates, if you drag the area around, it will mess up, because dragging the area seems always changing only the highlight area No.1. So if your button group is assigned to 2, the corresponding highlight area No.2 is still the original coordinates!
The EASIEST solution to solve this problem is to delete the highlight entirely, and do it from scratch, and DO NOT change anything thereafter.
5. Multiangle - the non-seamless way
This is more like encoding guideline for Canopus Procoder. I used to just use CCE to do any multi-angle encodes. Later I had success with Sonic CineVision with their guideline. But I've never tried using Procoder. So finally I took some time and played around with it.
The basic things for multi-angle encoding is to use closed GOP, CBR, disable scene detection, and make the angles same picture structure.
CCE has a multi-angle template:

Procoder settings:

Non-seamless angle in Scenarist:

The only thing different from the seamless angle (default) is to click on scenes, and pick Non-seamless drop down in property browser. By doing this, now you can add different audio and subtitle tracks to different angles, as long as the corresponding audio and subtitle has the exact parameter. The final result is when switching the angle, the audio and subtitle also switch automatically. Blu-ray has this non-seamless property by default.
6. Random, shuffle PGCs
To make PGCs random or shuffle is not that hard, but this is my first time to deal with it. So I just need to mention a few important points. First the term “Repeat Times” here is very confusing, what is really means is how many programs you want this PGC to play. PGCEdit actually got the same term as what I think the best.
Note that the number of programs you want to random or shuffle needs to be “+1” if you want a complete loop (that is to cover every program to play once in shuffle mode) So say if you got 62 programs and you want all programs to play at least once in shuffle mode, you need to put in 63 (62+1) in the “Repeat Times” field.
During my authoring, I got this error message "The first Program must be set as a Chapter if the PGC is in random or shuffle mode.” For some reason, my PGC was messed up with no chapter number (the little number 1, 2, 3 as shown in the upper part of the picture). But for a valid random, shuffle PGC, it needs one chapter number on the first program as seen in the lower part of the image. The rest Programs don’t have numbers! My solution to solve the error was to completely remove all programs, and add them back. Thankfully the setting retains.
To be continued…?